
In case you haven’t heard of VPN – Virtual Private Network, it’s a set of specially configured servers that allow you to secure and hide your identity while browsing the Internet. But other than security and privacy factors; VPN can also be useful for gaming and streaming through a gaming console, like the Sony PlayStation.
For instance, the discount coupons and gift cards on the PlayStation store may only be applicable in a particular region or certain games may launch earlier in some countries. So, using a VPN, you can circumvent this geo restriction. Also, if you like watching Netflix, Youtube, Twitch, or other digital content through your PlayStation, the VPN will allow you to access region-restricted content easily. (Source: hongkiat)
So in this post, we’re going to talk about how to get your Playstation connected to a VPN. Here we will be using SurfShark VPN, and we will show you two different methods to set it up:
- VPN on Playstation via router
- VPN on Playstation via PC Hotspot
Note: If you don’t have a SurfShark account, click here to sign up for one.
Method 1 – Connect PS to VPN via Router
First, we are going to see how to set up VPN directly in your Router. This will allow any device, including your PlayStation, connected to this router to automatically connect to VPN so you don’t need to enable VPN on your device.
Before we get started, here are a few things you will need:
- Router’s IP Address,
- SurfShark Service Credentials,
- SurfShark server configuration file, and
- Compatible router.
1. Router’s IP address
In general, your router’s IP address could be 192.168.1.1, 192.168.100.1 or 10.0.0.1, but if that’s not the case, you can follow the instructions below to retrieve it.
Windows users (Method #1):
- Click the Search Icon on the bottom left, type “Command Prompt” and hit Enter.
![]()
- Type**
ipconfig** in Command Prompt app and hit Enter.

- Your router’s IP address is displayed under “Default Gateway”. Note the IP address down for later use.
Windows users (Method #2):
- Click Search Icon on bottom left, type “Control Panel” and hit Enter.
- In the Control Panel windows. click “View network status and tasks” under “Network and Internet”.
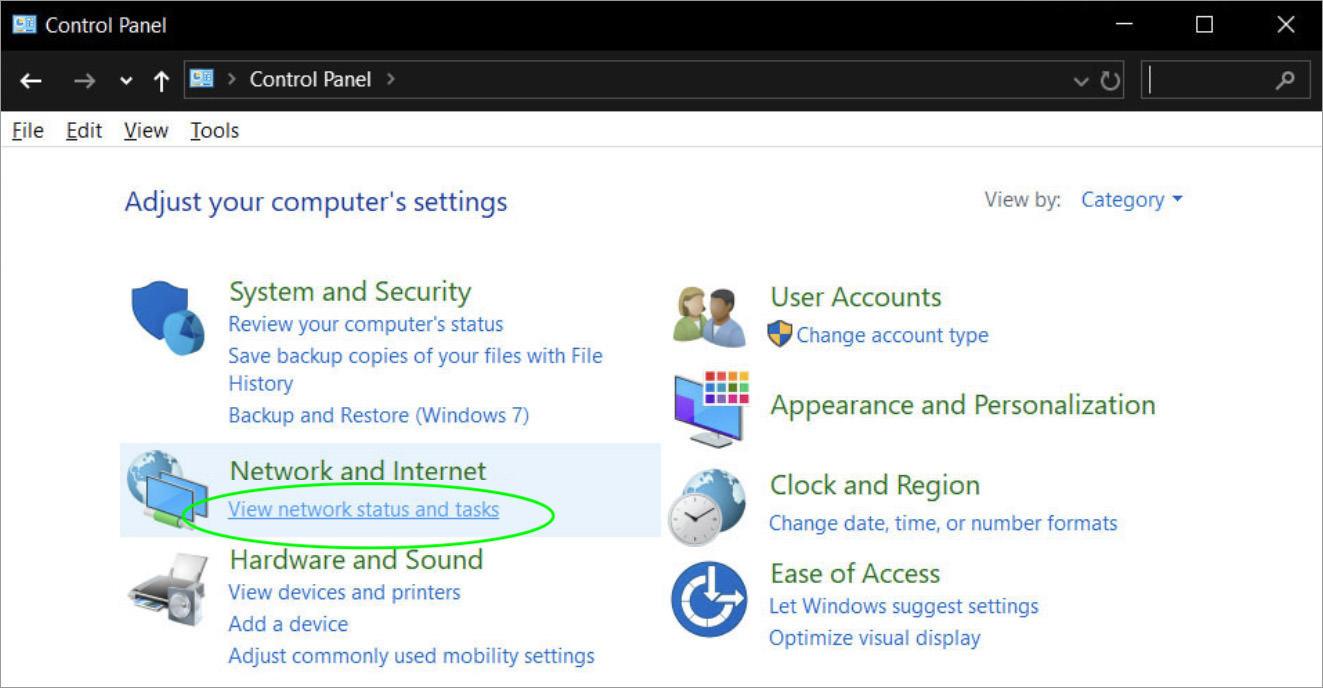
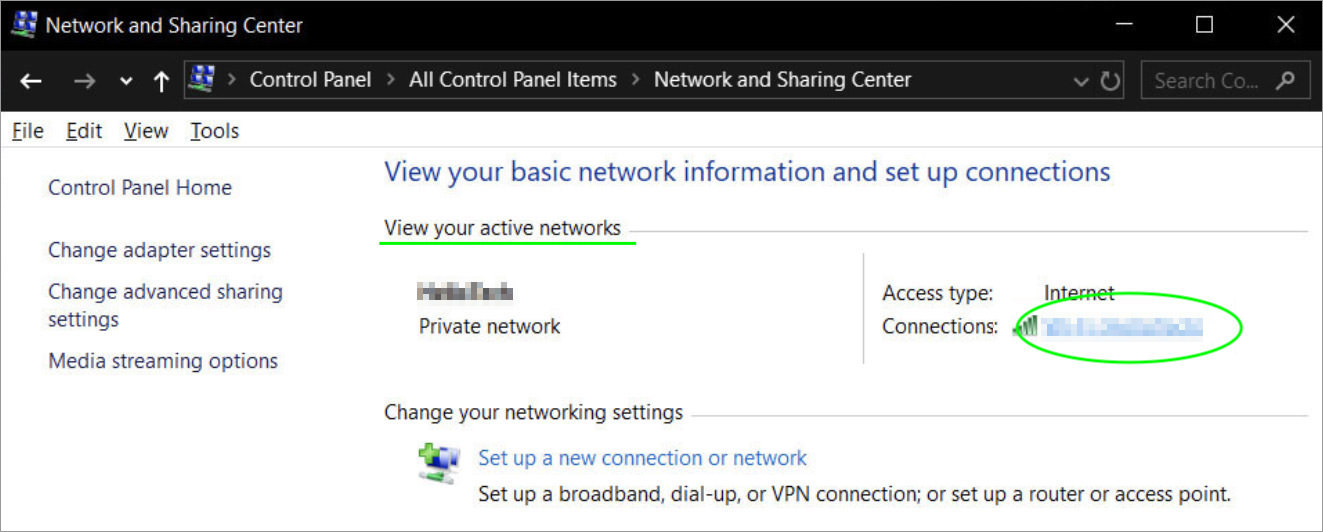
- Under “View your active networks”, look for Connections. Click on the Wi-Fi connection name (in blue text).
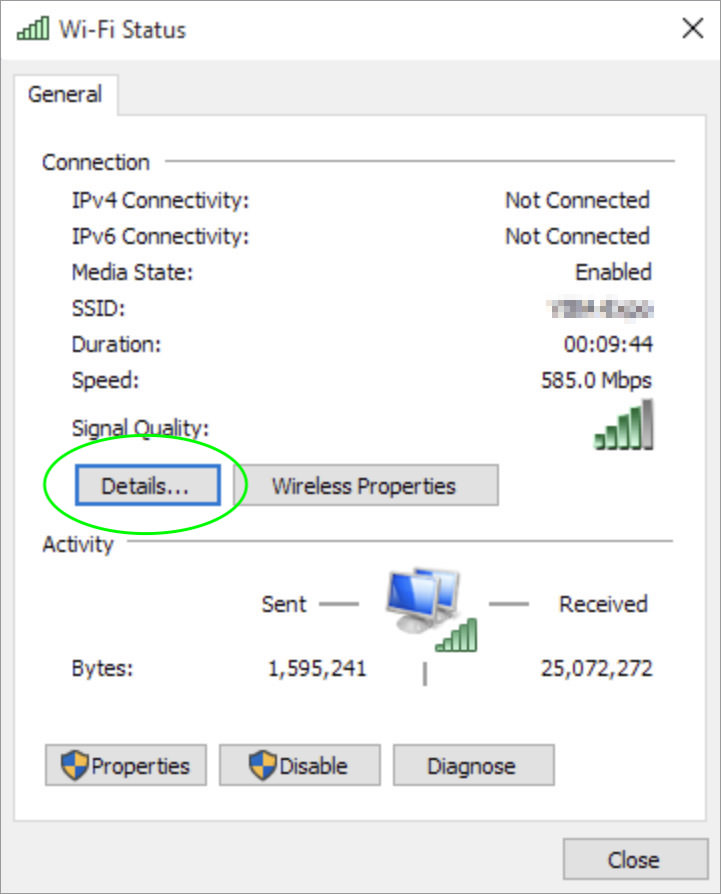
- In the “Wi-Fi Status” window, click “Details…“.
- Inside the “Network Connection Details” window, you’ll find your router’s IP address beside “IPv4 Default Gateway”.
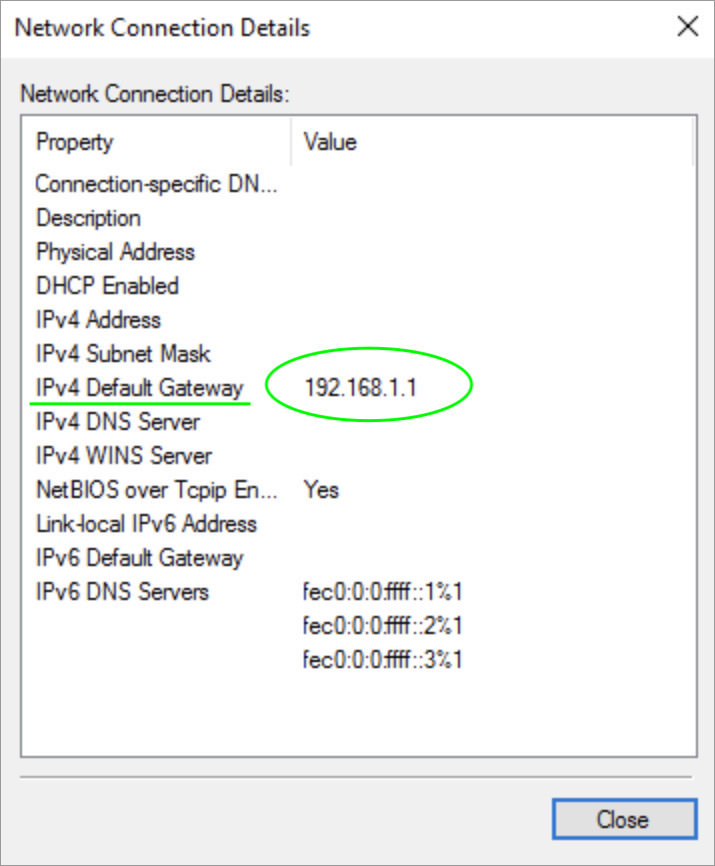
- Note the IP address down for later use.
macOS users:
- Go to System Preference Network.

- Select the network you are currently connected to, then click**“Advanced…”** on the bottom right.
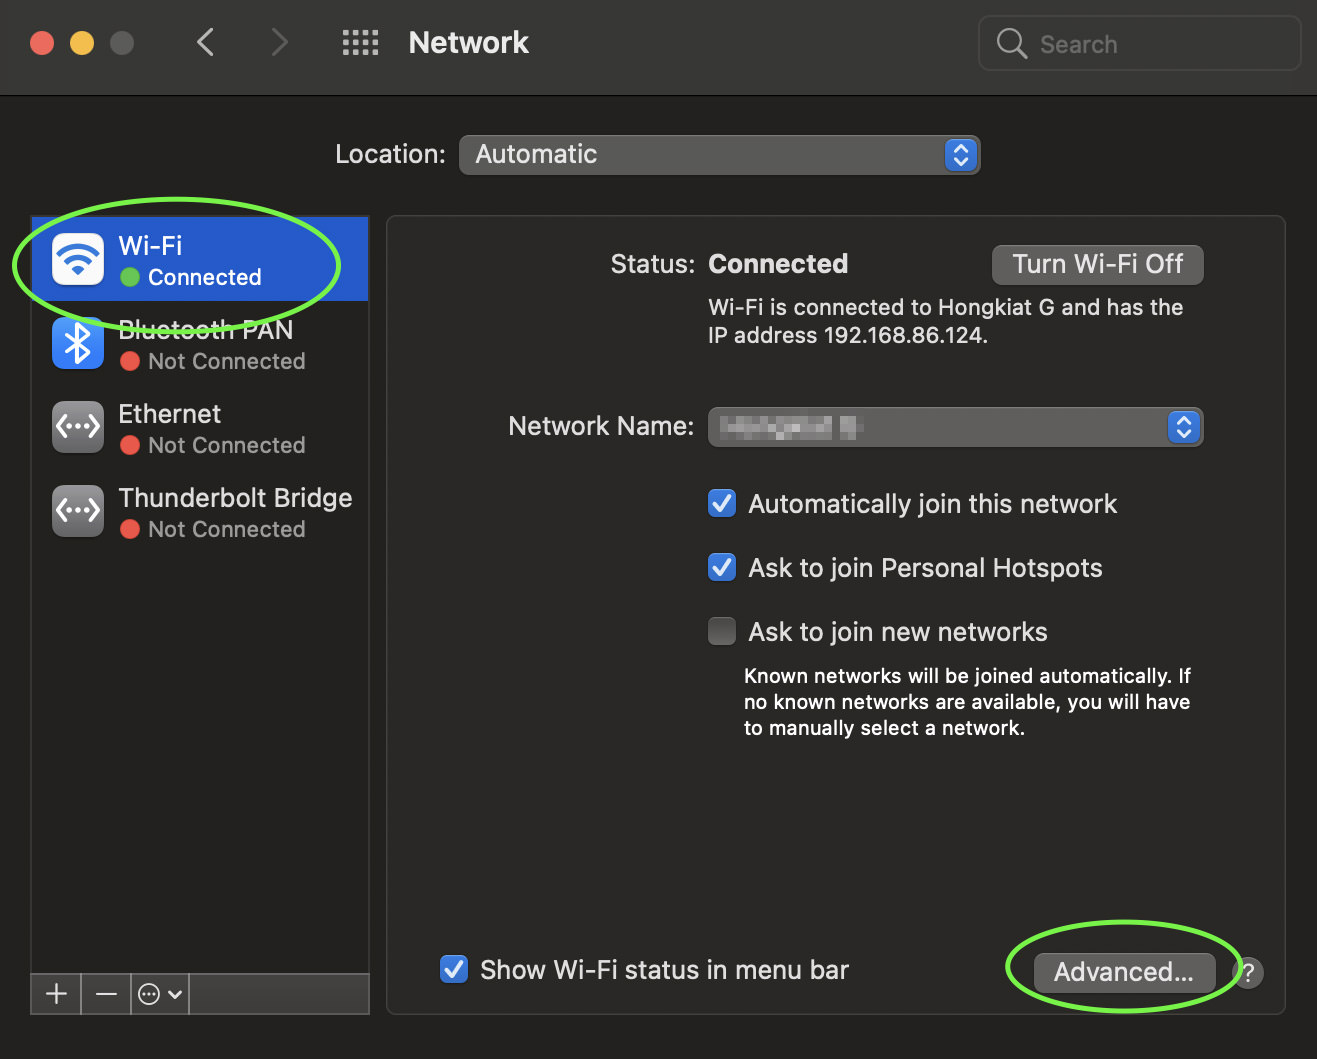
- Go to**“TCP/IP”** tab.

- You will find your router’s IP address beside “Router:”.

- Note the IP address down for later use.
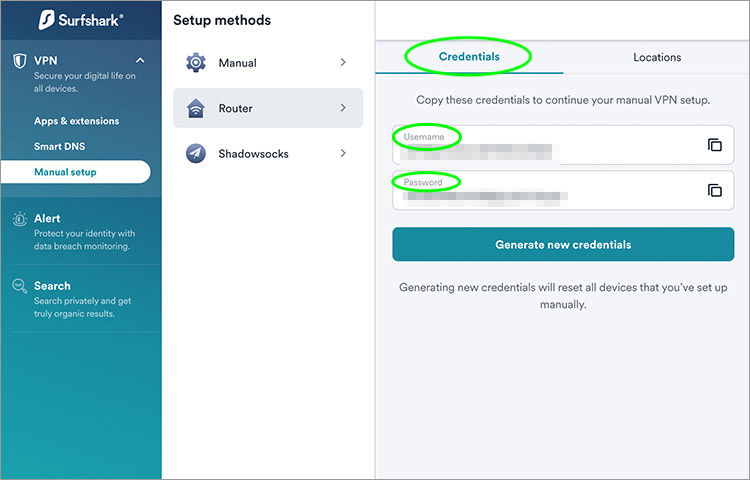
2. SurfShark Service Credentials
To retrieve your SurfShark service credentials, follow these steps:
- Login to SurfShark, then navigate to the Manual Setup Router on SurfShark dashboard.
- Click on the Credentials tab. Here you will find your Username and Password.
3. SurfShark server configuration file
We also need the OpenVPN configuration file. Follow these instructions below to get one:
- Navigate to Manual Setup Router on your SurfShark dashboard.
- Click**“Locations”** tab. Here’s a list of locations with the OpenVPN config you can download.
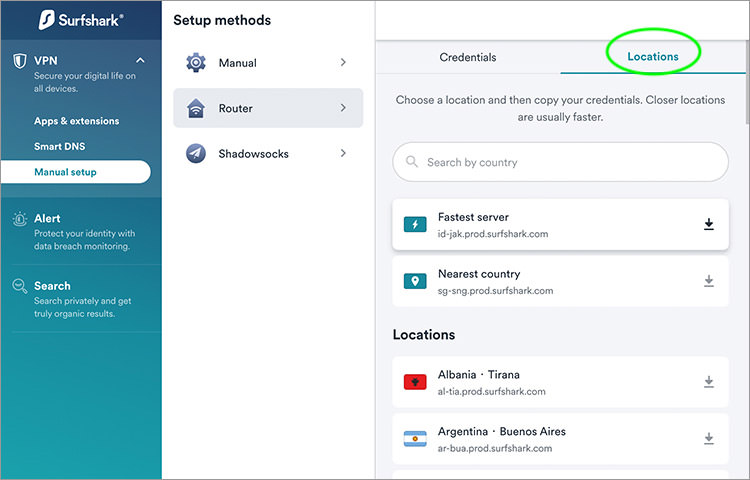
- Single click on the location you want to use.
- In the new pop up window, click**“Download TCP”** to download the desired location’s .ovpn file.
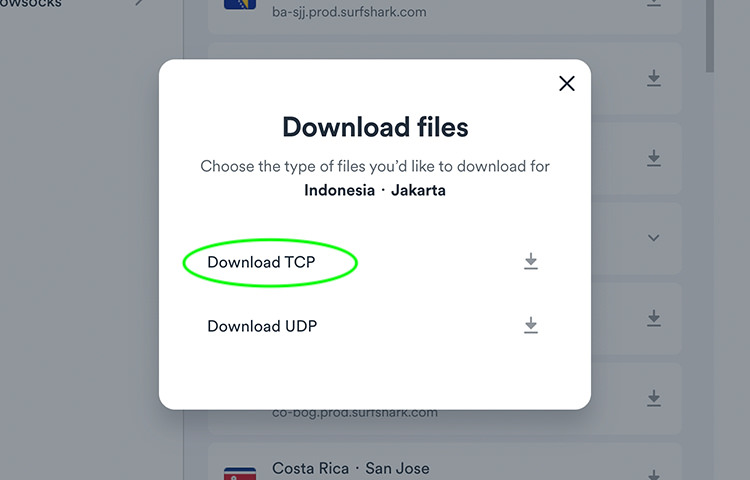
- Keep the downloaded .ovpn file easily accessible (i.e, on Desktop) for later use.
4. Compatible router
Last but not least, you will need a compatible router in order for this to work.
In this tutorial, we will be using an ASUS router as it has built-in support for OpenVPN in their firmware right out of the box (no need to install new firmware in the router).
Other compatible routers include:
Let’s get started…
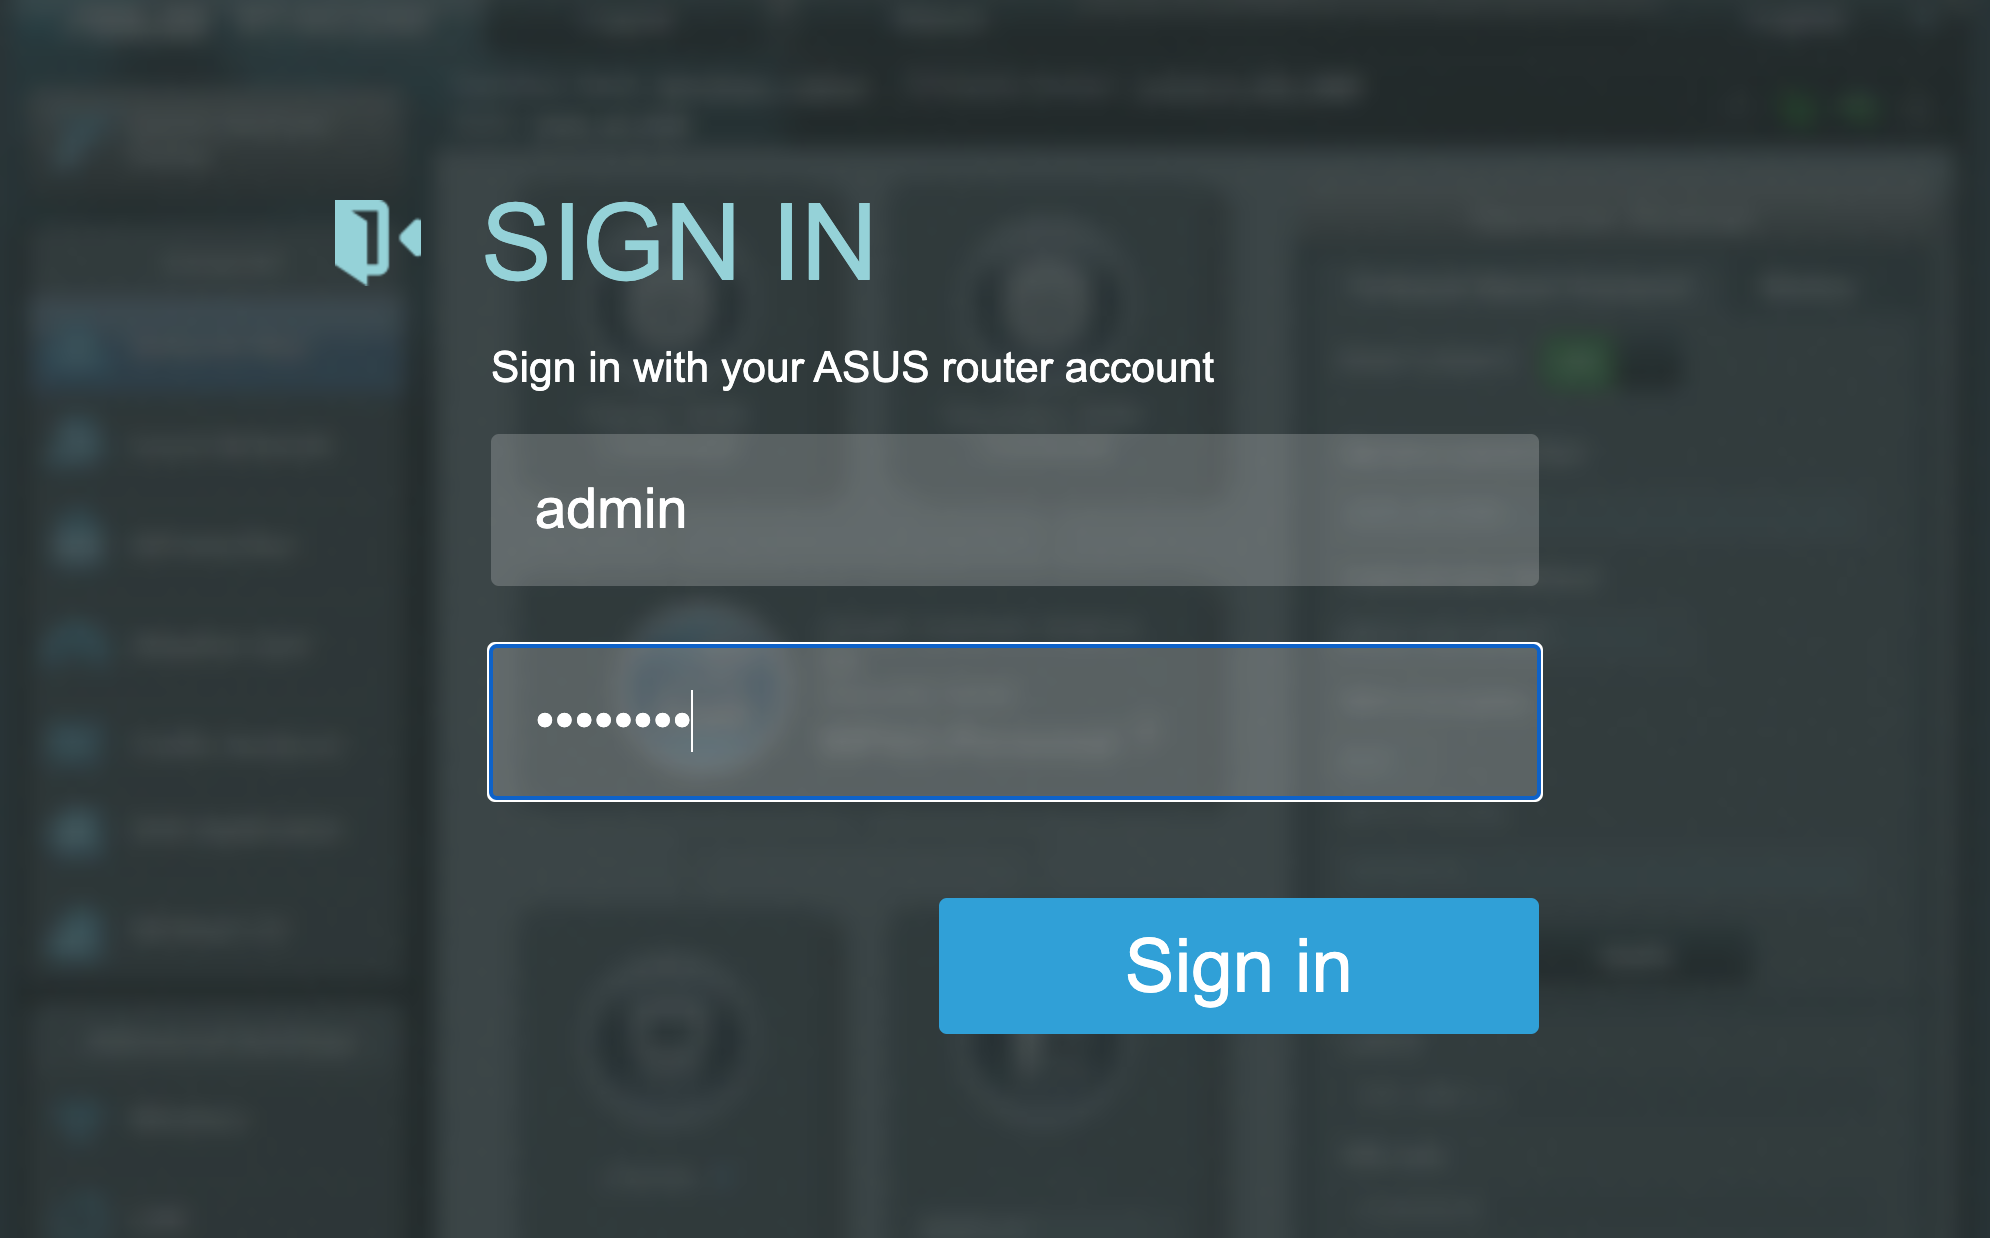
- Type the IP address we retrieved earlier in the browser and hit Enter. You will be directed to the router’s admin interface. (In this case, we’re using an ASUS router, as seen below.)
- Login with your username and password. (If you have never configured your router before, the credentials should be admin/admin or admin without a password.)
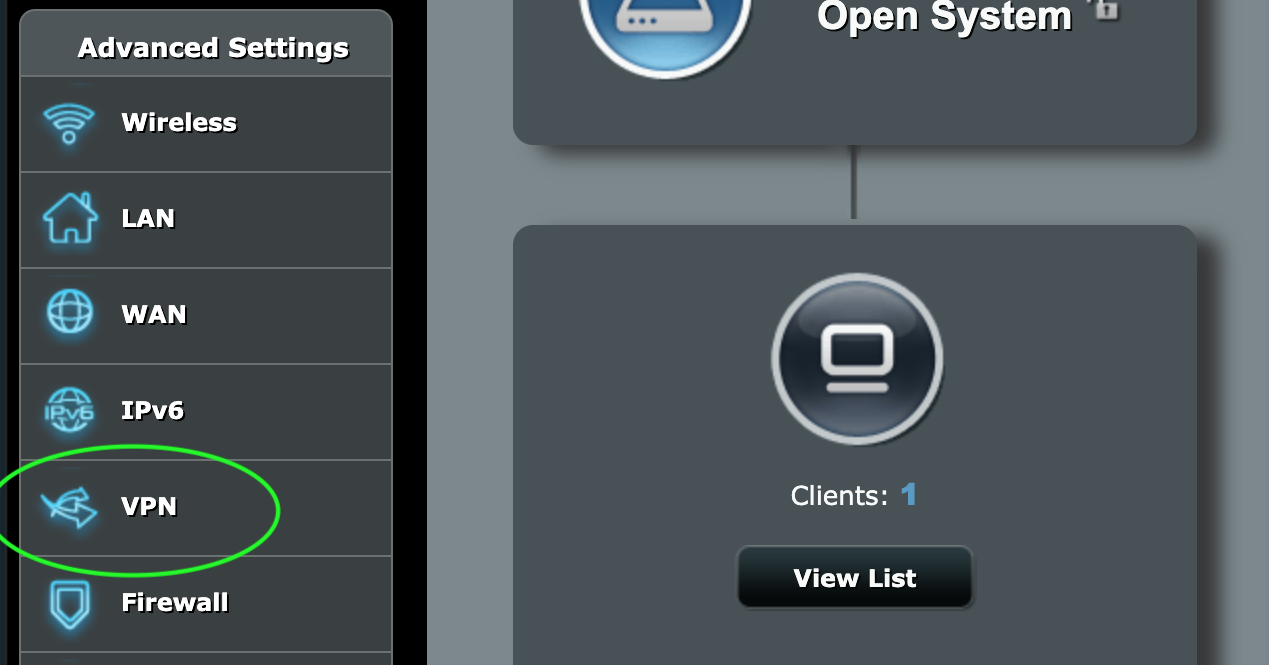
- Upon logged in, click “VPN” under “Advanced Settings” on the left sidebar.
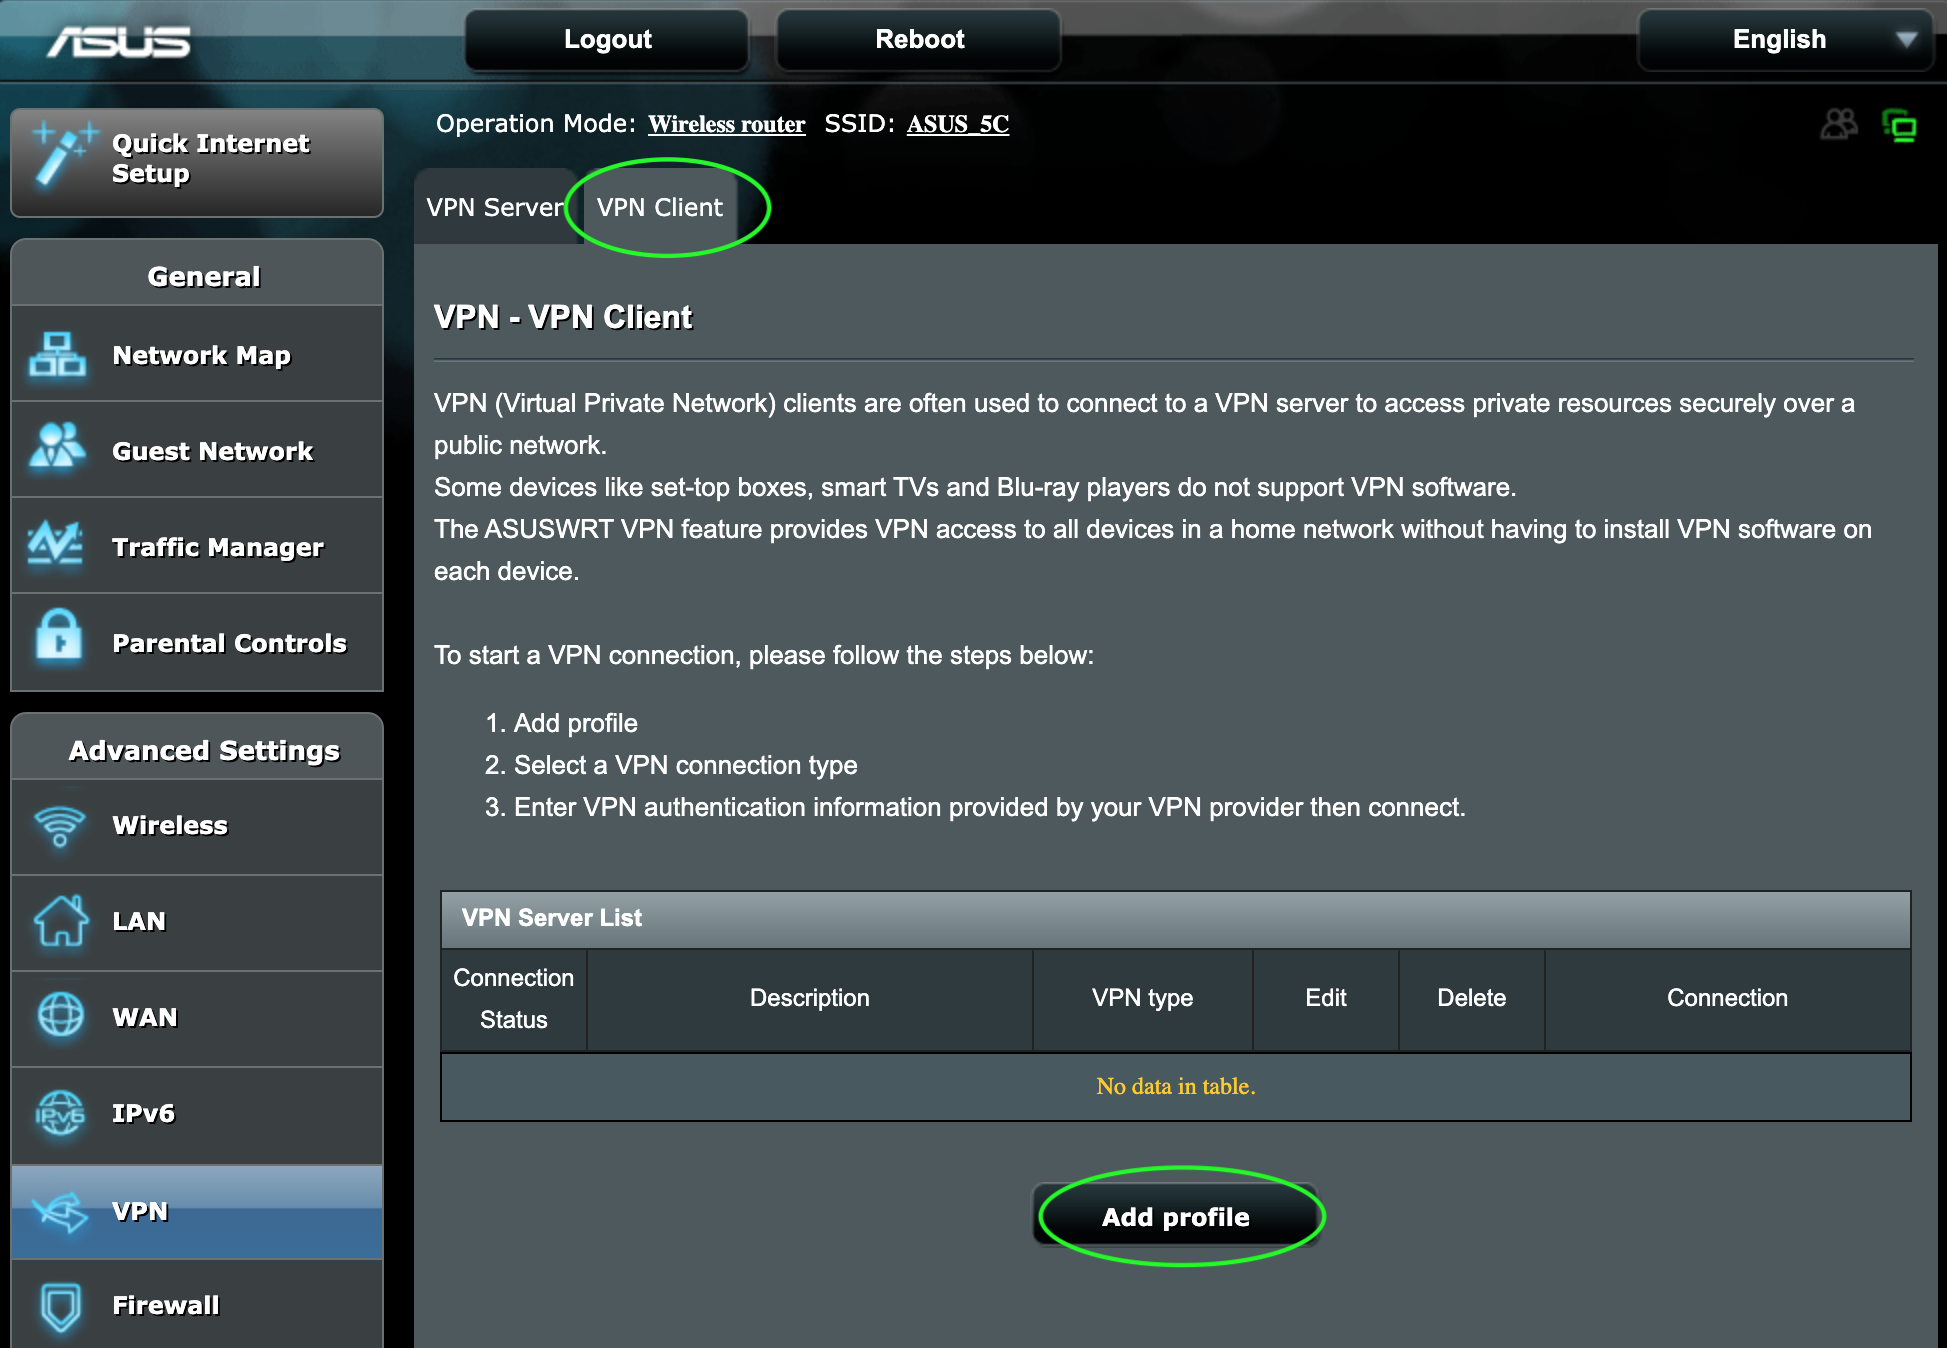
- Click the “VPN Client” tab, then click**“Add profile”** button.
- Next, click navigate to the “OpenVPN” tab.
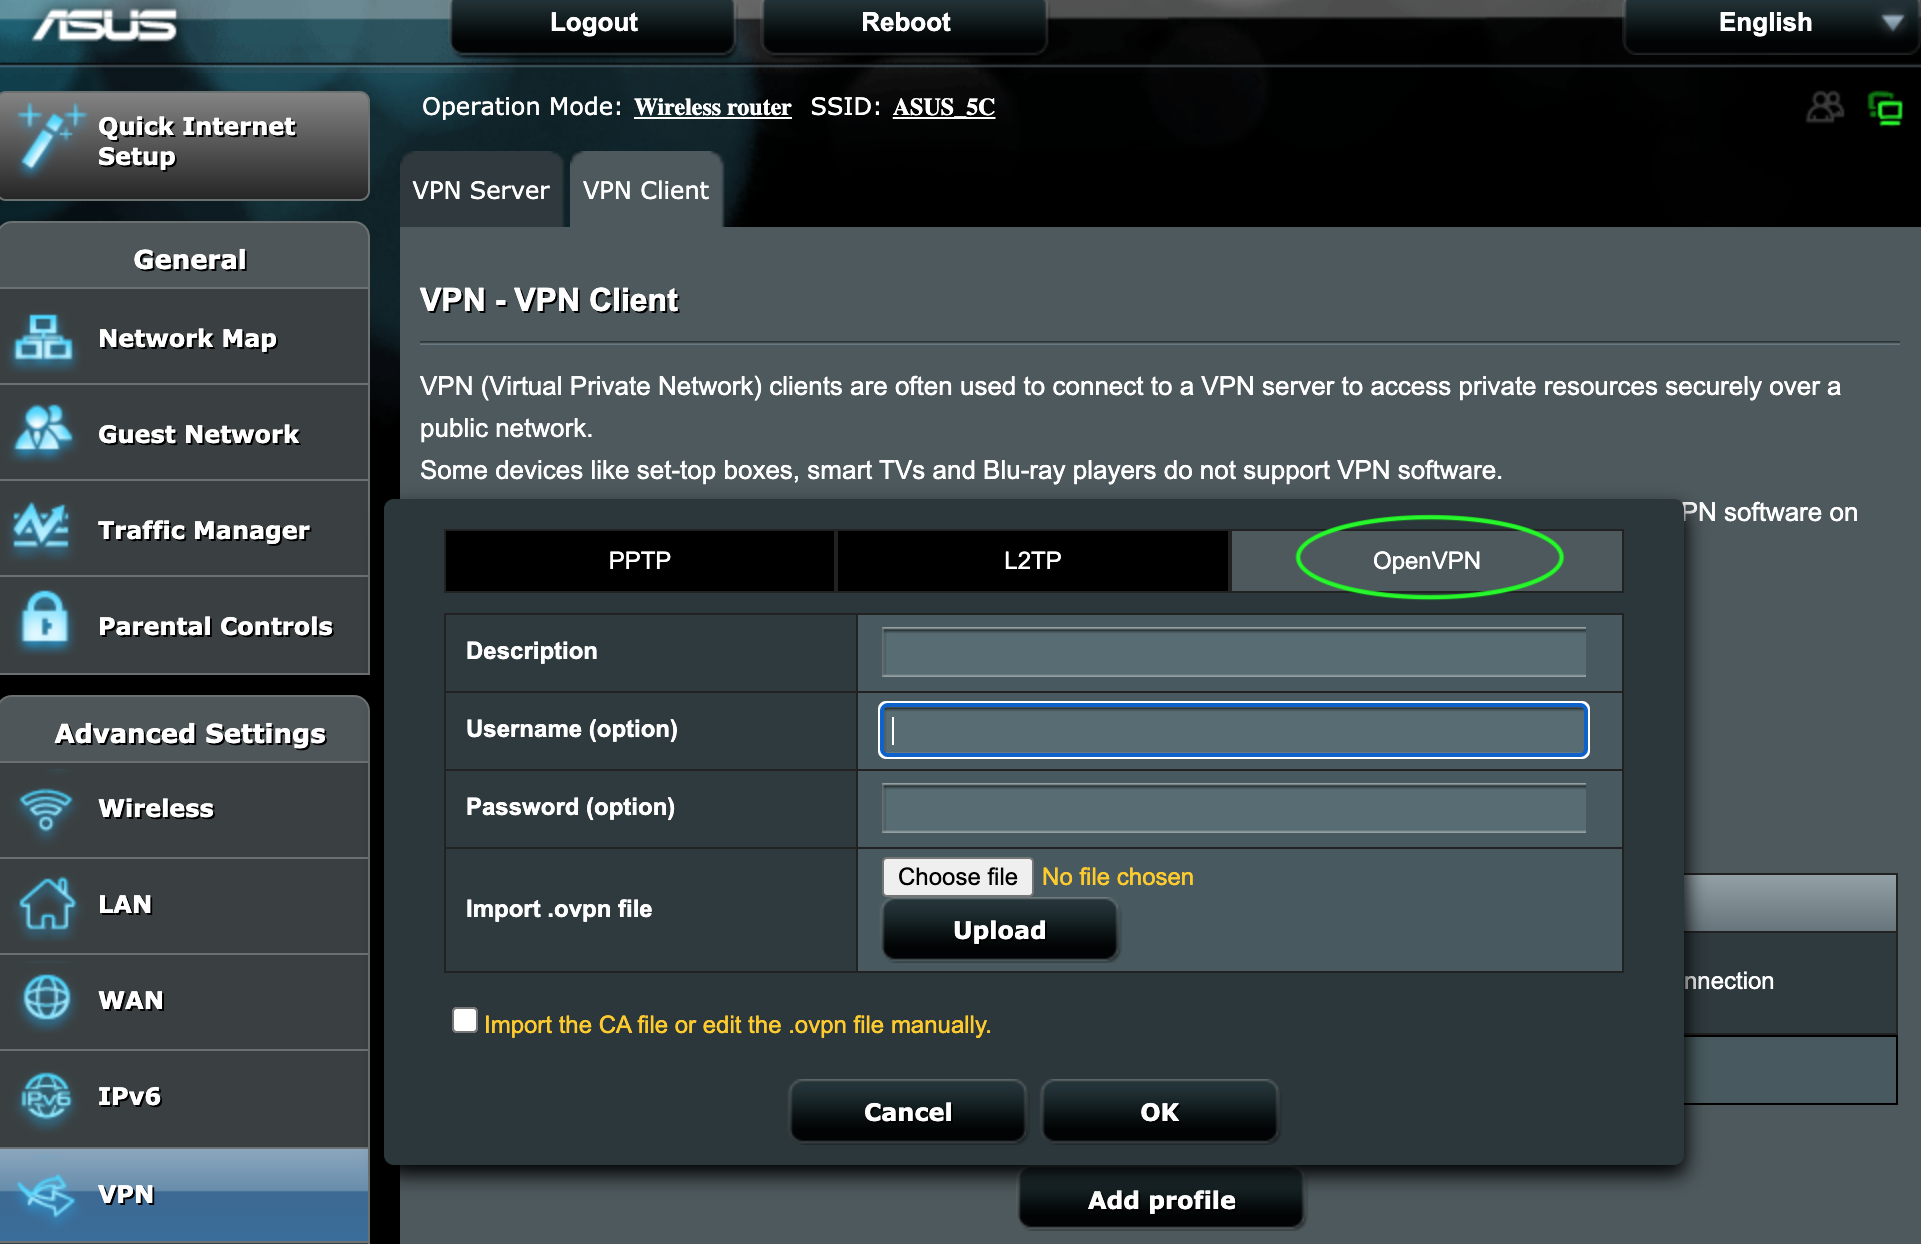
- Fill up Description, Username, Password, and then upload the .ovpn file. Description: Description of VPN profile (example: VPN – USA). Username Password: SurfShark Service Credentials retrieved earlier. Import .ovpn file: SurfShark server configuration file downloaded earlier. Make sure all fields are correctly input, then click OK.
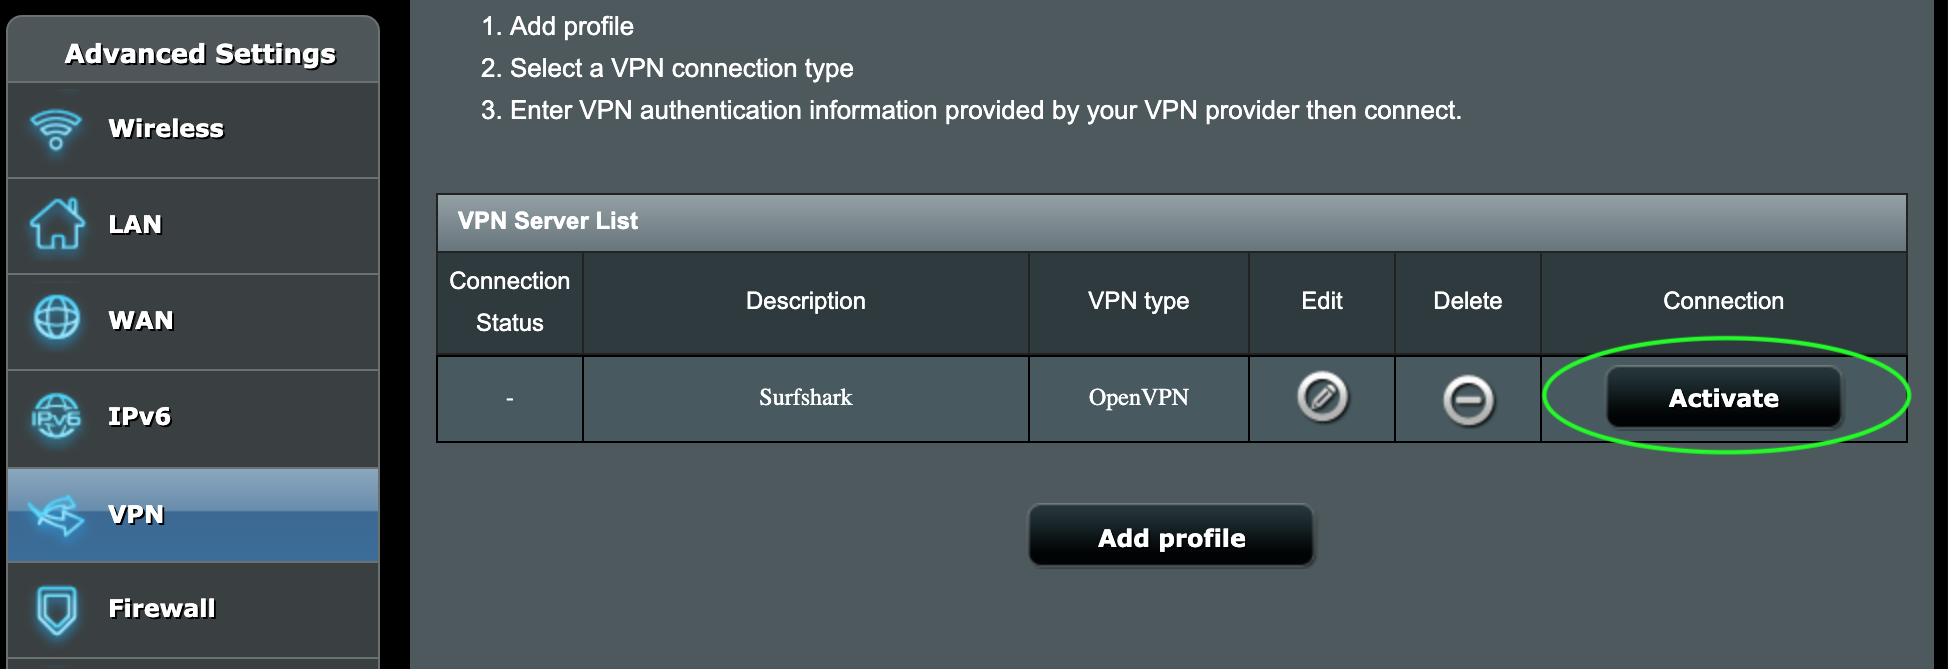
- Back at the "VPN Client" page, click Activate.
- Now, on your PlayStation game console, navigate to Network Set Up Internet Connection.
- Select “Use Wi-Fi”, then select “Easy” on the next screen.

- Find, and then connect the newly created Wi-Fi network.
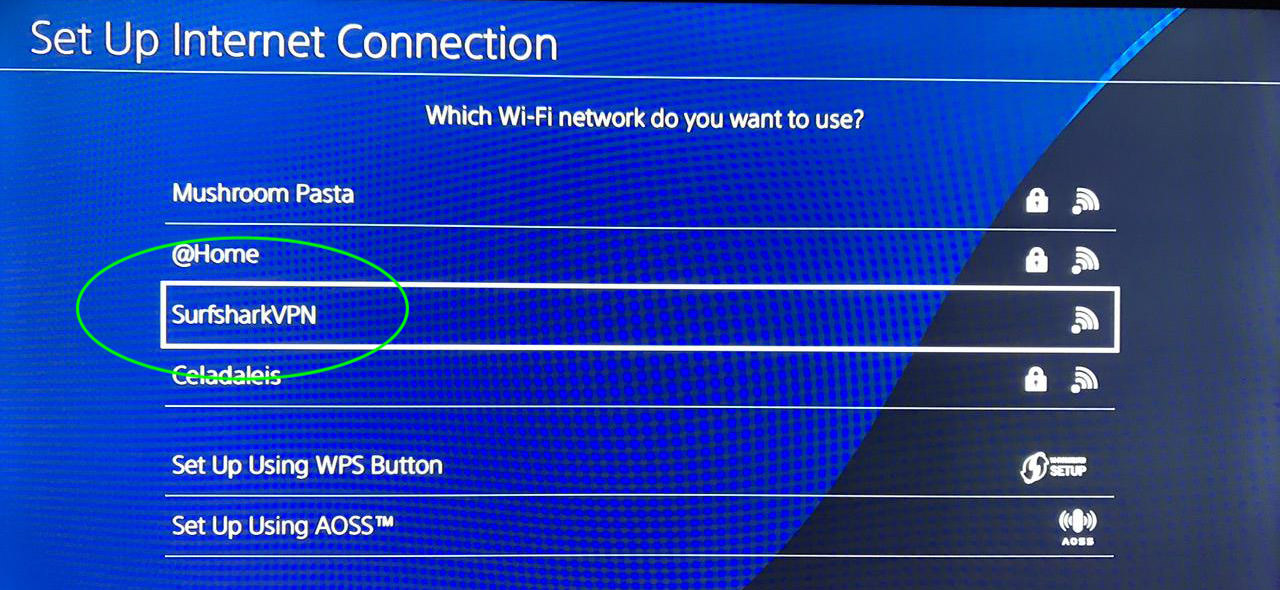
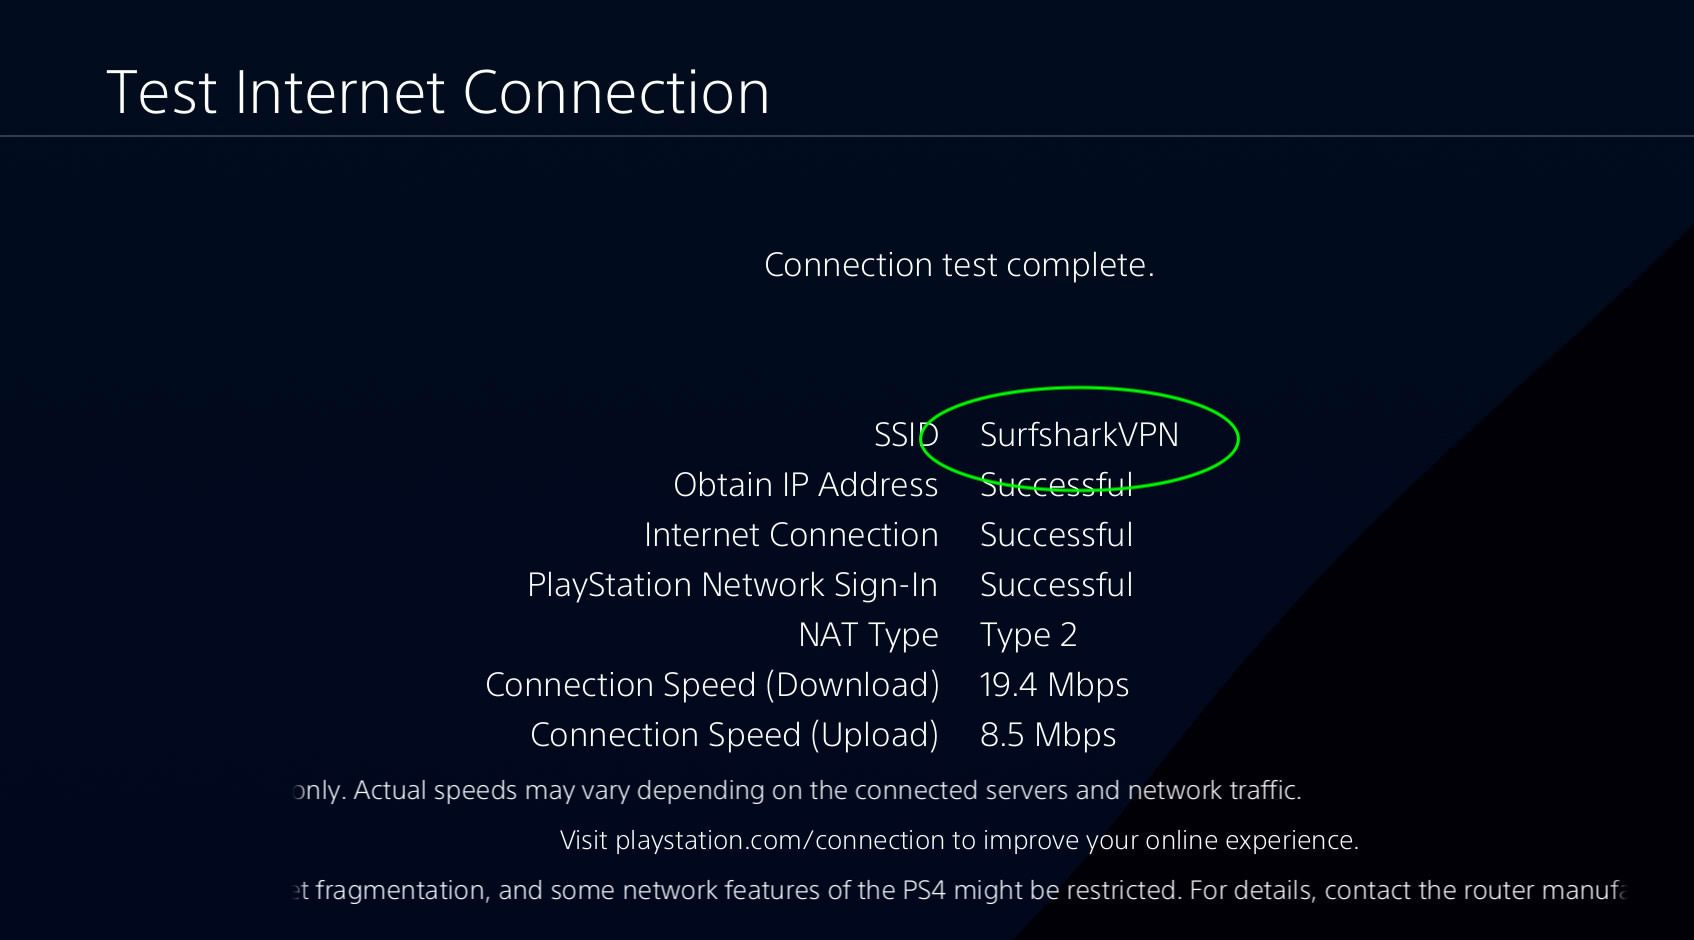
- That’s it! The Playstation should now be connected to your newly created SurfShark VPN.
Method 2 – Connect PS to VPN via PC
In case, you don’t have a compatible router to install a VPN configuration, you can use your PC as a tunnel for your PlayStation to the VPN-enabled connection.
The only thing you need in order to proceed in this method is to download, and install the SurfShark VPN app.
Step 1: Navigate to TAP adapter settings
To begin, we are going to check the Windows TAP adapter. TAP adapter is a network driver that’s required for the VPN to establish a secure connection on your computer.
- Right-click the Wi-Fi icon on the bottom right of your screen, then click “Open Network Internet settings”.

- Depending on your current computer connection to the Internet, go to either**“Wi-Fi”**or “Ethernet” section.

- Scroll down, find and click on “Change adapter options”.

- In this new window, you should see the SurfShark TAP adapter along with other adapter as seen below, including one that we are currently using to connect to the Wi-Fi. Keep this open, proceed to the next step.

Step 2: Enable Mobile Hotspot
We need to enable the mobile hotspot that will other device to connect to the Internet through our Windows PC.
- Right-click Wi-Fi icon again, then go to “Open Network Internet settings”.
- Then, on the left sidebar, look for “Mobile hotspot”. Click on it.

- Under “Share my Internet….”, click once to turn on Mobile hotspot. Your Network name and Network password will be displayed. (Note: You can change the network’s name or password by clicking Edit.)

Step 3: Configure the VPN adapter
Switch over to the previous Network Connections window that we’ve opened up in the initial steps to check the TAP adapter.
- You should see a new network adapter has appeared after Mobile Hotspot has been enabled. This adapter will be used to share the Internet connection from the PC.

- Left-click once on “SurfShark TAP” adapter, then right-click and select the**“Properties”**.

- In the new window, go to the "Sharing" tab.
- Next, check “Allow other network users to connect….”. Then, under “Home networking connection:” add the exact name of the new network adapter for the Mobile hotspot.

Step 4: Connect to the VPN
Finally, we are going to enable the VPN on our PC.
- Lauch the SurfShark app. Navigate to Settings Advanced Protocol, then select the OpenVPN (UDP) protocol.

- Connect to the VPN location. Generally, you’d want to connect to the fastest location SurfShark suggest.

- That’s it! Now all devices connected to this mobile hotspot will be routed to the VPN.
Happy learning!